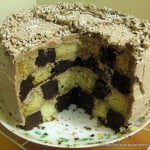
Checkerboard Cake
Checkerboard Cake / Chequered Cake is an eggless cake made without the special pan. It is filled and frosted with finger licking good Chocolate Buttercream Frosting. And when you slice - the inside is as beautiful as the taste.
Servings: 8 inch layered cake
Ingredients
for the chocolate cake
- 2½ cup all purpose flour
- 2 tsp baking soda
- 1 cup unsalted butter softened
- 2 cup milk
- 1 tsp vanilla extract
- ⅔ cup cocoa powder unsweetened
- ¼ tsp salt
- 2 cup brown sugar
- 2 tbsp white vinegar
for the chocolate buttercream
- 460 gram icing sugar sifted
- 226 gram unsalted butter softened
- 1 tsp vanilla extract
- 4 tbsp milk
- 120 gram chocolate melted
Instructions
for the chocolate cake
- Pre-heat oven to 180 °C. Line & grease an 8" round pan.
- Sift flour, cocoa, baking soda & salt together.
- Melt butter using a microwave. Don't burn it. Stir in sugar.
- Add milk, vinegar & vanilla to butter mixture & stir well.
- Add dry ingredients & whisk till well blended.
- Pour batter into prepared pan & bake for 60 mins or till inserted toothpick comes out clean.
- Cool the cake in the pan on a wire rack & then transfer to a plate.
- Wrap tightly in plastic wrap or cling film & refrigerate till required.
for the chocolate buttercream
- In a large bowl, beat butter till smooth & well blended using hand mixer.
- Beat in vanilla extract.
- On low speed slowly add sugar & continue beating. Scrape down sides if required.
- Add the milk & beat to combine.
- Add melted chocolate & beat.
- On high speed beat the frosting till light & fluffy, about 5-6 mins.
- Cover with plastic wrap when not using.
- I felt that frosting was just enough to cover the cake & hardly any left to decorate on top or sides. So I suggest to increase the recipe by 1.5 times.
assembling the cake
- Slice both cakes into horizontal layers such that you have 2 layers of each cake & 4 total.
- Cut out 2 rings each from all 4 layers. I placed 6" dia removable bottom of tart pan & cut a circle around it & then I used a 4" diameter lid & cut another circle within the 6" circle.
- Carefully remove the middle ring of all layers.Using a spatula, lightly spread buttercream filling on the insides of the remaining rings. Lightly spread butter cream on outside of middle rings as well. This helps in sticking the rings together & not make a mess while cutting the cake. Then place the middle rings backs in alternating colors - place chocolate color ring in white cake & vice versa. Now you have 4 layers of cake with alternating colored rings.
- Now place 1 prepared layer of cake on the base or cake table. Soak in coke. Lightly spread the filling & then place the 2nd layer such that the rings are stacked alternate to each other - chocolate color ring on top of white colored ring, then place the 3rd layer again alternating colors on top of each other & then the last layer similarly.
- Keep the cake in freezer for 10 mins. This reduces the amount of crumbs to deal with while frosting.
- Quickly do a crumb coat on the whole cake & then decorate as per your whim.
Notes
- Refrigerating the cake 10-15 mins before slicing layers & rings will help in a neater finish. It also gives lesser crumbs to mess while frosting.
- It may help if you first place the layer you want as a base on the cake table & then exchange rings & place other rings on top & biding together with buttercream instead of making separate layers. The risk of layers falling apart in the transfer is reduced then.
- I used 1/4 cup of Coke (for soaking).