
Do you ever crave something so badly that you just have to make it, even if you have no clue how? That was me with this Eggless Dark Chocolate Mousse Cake.
It started when I was having one of those weeks – you know when nothing goes right and all you want is something chocolatey to make life better. I had this idea in my head of a mousse cake – light, fluffy, chocolate-packed, but without eggs. Sounds easy, right? Wrong.
The first time I tried making it, I ended up with a mousse that refused to set. It was more like chocolate soup sitting on top of a sad, dry cake. Not my finest moment. The second attempt? The mousse was perfect, but the cake was a dense brick. By the third try, I was pretty much ready to swear off baking forever.
Then one night, totally on a whim, I gave it another go. No overthinking, no stressing – just baking for fun. And somehow, everything just worked. The cake was soft, the mousse was creamy, and when I took that first bite, I knew I had finally cracked it.
Since then, this has become my no-fail, stress-busting dessert. Whether I’m celebrating or just need a little chocolate therapy, this is what I turn to. And now, I get to share it with you!
This is the magic of Mousse Cakes and Why They’re Everyone’s Favorite Dessert!! Find more decadent desserts like Coffee Whiskey Cake, dark chocolate mousse, and no-bake chocolate mousse cake recipes!!
Let’s dig into the recipe so you can experience this chocolatey perfection yourself!

Ingredients to Make Dark Chocolate Mousse Cake:
For the Chocolate Cake Base:
- 1 cup all-purpose flour
- ⅛ cup + 1 tsp cocoa powder
- ¼ tsp baking soda, heaped
- ¼ tsp salt
- ½ cup +1 tbsp sugar
- 4 tbsp olive oil
- 1 tsp vanilla extract
- 2 tsp white vinegar
- 1 tsp instant coffee granules
- ⅔ cup hot water
For the Dark Chocolate Mousse:
- 110g dark chocolate (70% cocoa), chopped
- 1 cup heavy cream (or coconut cream for dairy-free)
- 1 tbsp confectioners’ sugar
- ½ tsp vanilla extract
- ¼ cup hot water
- ⅛ cup cocoa powder
Step-by-Step Instructions:
1. Bake the Chocolate Cake Base:
- Preheat your oven to 180°C (350°F). Grease and line an 8-inch round cake pan.
- In a mixing bowl, sift together flour, sugar, cocoa powder, baking soda, and salt. Do not use mixer.
- In a separate bowl, whisk together water, oil, vanilla extract, and instant coffee.
- Gradually fold the dry ingredients into the wet mixture untill just combined. A few lumps are fine.
- Pour the batter into the prepared pan and bake for 25-30 minutes, or until a toothpick inserted in the center comes out clean.
- Let the cake cool completely before removing it from the pan. Invert it on the rack. Leave it upside down to cool, it helps in flattening any dome shape.
- I baked three layers by baking this recipe thrice separately. And then froze the layers wrapped in cling film.
2. Prepare the Dark Chocolate Mousse:
- Start by whisking the hot water and cocoa powder together, then set it aside.
- Melt the dark chocolate using a double boiler or in the microwave. Let it cool slightly.
- In a pre-chilled bowl, whip the heavy cream and powdered sugar until soft peaks form.
- Fold the melted chocolate and vanilla extract gently into the whipped cream until fully incorporated. Be careful not to over-mix — we want the mousse to stay light and fluffy.
- Cover the mousse and refrigerate it for at least 2 hours (or up to 2 days) to let it set. This will yield about 2 cups of velvety chocolate mousse, ready to be layered on your cake!
3. Assemble the Cake:
- Move the frozen layers to the refrigerator for a few hours before assembling. Place the first layer on a platter or cake stand.
- Make some holes into the bottom layer using a form. Soak the bottom layer in sugar syrup.
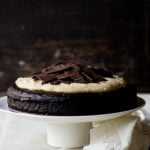
- Pour the dark chocolate mousse over the cake, smoothing the top with a spatula. Place the second layer on top of the bottom layer & repeat the process of soaking & spreading mousse. Finally, place the top layer & again soak it. Lightly spread the mousse on top & sides of the cake.
- Refrigerate for at least 4 hours or until the mousse sets. I refrigerated for 24 hrs before cutting covered in a cake dome as I wanted the flavors to set in. Serve chilled.


What I Wish I Knew Before Making This Cake
Look, I’ve had my fair share of baking fails. I’m talking about mousse that refused to set, layers that slid apart like a landslide, and chocolate that mysteriously vanished (because, let’s be honest, I kept eating it). But after way too many attempts, I finally figured out a few things that actually make a difference.
Cold Cream is Non-Negotiable – If you try whipping room-temperature cream, you’ll end up with a sad, runny mess. Learned that one the hard way. Stick it in the fridge for a while before whipping – it makes all the difference.
Patience = Pretty Layers – If you’re like me and get excited to finish assembling your cake too soon, you might regret it. Let the mousse chill completely before adding anything on top. Otherwise, things start sliding, and suddenly, your cake looks like a mini earthquake hit it.
Chocolate Matters! – I used to just grab whatever chocolate I had, but trust me – it makes or breaks the cake. If you love that deep, slightly bitter taste, go for darker chocolate. If you like a little sweetness, semi-sweet works better. And if you’re like me, you’ll probably “taste-test” half the chocolate before it even makes it into the recipe. No judgment.
How I Love to Dress Up My Dark Chocolate Mousse Cake?
Baking the cake is one thing, but making it look as good as it tastes? That’s where the fun really begins! I used to just slap on some chocolate and call it a day, but over time, I picked up a few little tricks that make a mousse cake look like it came straight from a fancy bakery.
Chocolate Curls – The first time I tried this, I made a huge mess, but once I got the hang of it, I was obsessed. Just take a chocolate bar and run a vegetable peeler along the edge—it creates those delicate curls that instantly make any dessert look next-level. Bonus: you get to snack on the extra bits!
Fresh Berries = Instant Elegance – Whenever I feel like my cake needs a pop of color (or I just want an excuse to eat more fruit), I throw on some raspberries or strawberries. Not only do they make the cake look amazing, but the slight tartness also balances out all that rich chocolate.
Edible Flowers (When I’m Feeling Fancy) – I’ll be honest, I don’t do this all the time, but for birthdays or celebrations, adding a few edible flowers makes the cake feel extra special. I once made one for a friend’s party, and everyone thought I had ordered it from a bakery. Little did they know, it was just me, my kitchen, and a whole lot of trial and error!
Making It Work for Everyone – My Tweaks for Special Diets
- Egg-Free (Because This One Already Is!) – I’ve always loved eggless baking, but if you ever need an extra bit of structure, a simple flaxseed-and-water mix does the trick. It’s a little secret I use when I want a firmer texture.
- Vegan-Friendly? Totally Doable! – A few easy swaps make this cake completely plant-based. Coconut cream works beautifully in place of dairy cream, giving the mousse a subtle tropical hint (which, honestly, I don’t mind at all). Just double-check that your chocolate is dairy-free, and you’re all set!
- Gluten-Free for My GF Friends – If you need a gluten-free version, a good almond flour base or a gluten-free baking mix keeps everything light and delicious. I once made it this way for a get-together, and no one even noticed the difference!

Storing and Serving My Dark Chocolate Mousse Cake
If there’s ever a dessert that disappears fast, it’s this one! But on the rare chance you have leftovers:
- Fridge: Keep it covered and chilled for up to three days.
- Freezer: Slice and wrap it well—you’ll thank yourself later!
- Serving Tip: Let it sit out for a few minutes before digging in. A little whipped cream or shaved chocolate? Chef’s kiss!
Honestly, the hardest part isn’t making this cake – it’s not eating the whole thing at once! 😄

Dark Chocolate Mousse Cake
Ingredients
for the cake:
- 1 cup all purpose flour
- ½ cup +1 tbsp sugar granulated
- ⅛ cup + 1 tsp cocoa powder unsweetened
- ¼ tsp baking soda heaped
- ¼ tsp salt
- ⅔ cup hot water
- 4 tbsp olive oil
- 2 tsp white vinegar
- 1 tsp instant coffee granules
- 1 tsp vanilla extract
for the sugar syrup:
- ¼ cup sugar
- ¾ cup water
for the dark chocolate mousse filling
- 110 grams dark chocolate (preferably 70% cocoa)
- 1 cup whipping cream
- ½ tsp vanilla extract
- 1 tbsp confectioners’ sugar
- ¼ cup hot water
- ⅛ cup cocoa powder
Instructions
for the cake
- Pre-heat oven to 180 °C. Line the bottom of one 8 inch pan.
- Whisk together flour, sugar, cocoa, baking soda & salt in a large mixing bowl. Do not use mixer.
- Combine water, oil, vinegar, instant coffee & vanilla in a separate bowl.
- Add to the dry ingredients & whisk till just combined. A few lumps are fine.
- Pour batter into the prepared pan & bake for 20-25 mins till tooth pick inserted in center comes out clean.
- Cool the cake in the pan on the rack for 15 minutes, then invert it on the rack. Leave it upside down to cool, it helps in flattening any dome shape.
- I baked three layers by baking this recipe thrice separately. And then froze the layers wrapped in cling film.
for the sugar syrup
- Boil water & sugar together. Once it boils, lower the flame & allow it to heat for another 1 minute. Remove from heat & cool completely. It can be made in advance & stored in refrigerator.
for the dark chocolate mousse filling
- Start by whisking the hot water and cocoa powder together, then set it aside.
- Melt the dark chocolate in a heatproof bowl over simmering water or in the microwave, and once it’s melted, let it cool slightly.
- Now, pour the cocoa-water mixture into the chocolate and stir until it’s thick and smooth. Set this aside to cool.
- Next, grab your mixer (either a hand mixer or stand mixer with the whisk attachment) and whip the heavy cream, powdered sugar, and vanilla on medium-high speed for about 3-4 minutes, until medium peaks form. You’ll know you’ve reached the sweet spot when the peaks hold their shape but still have a soft, airy texture.
- Now, gently fold the chocolate mixture into the whipped cream using a spoon or rubber spatula. Be careful not to over-mix — we want the mousse to stay light and fluffy.
- Cover the mousse and refrigerate it for at least 2 hours (or up to 2 days) to let it set. This will yield about 2 cups of velvety chocolate mousse, ready to be layered on your cake!
assembling the cake
- Move the frozen layers to refrigerator few hours before assembling. Place the first layer on a platter or cake stand.
- Make some holes into the bottom layer using a fork. Soak the bottom layer in sugar syrup. Then lightly spread chocolate mousse over it. Place the second layer on top of the bottom layer & repeat the process of soaking & spreading mousse. Finally place the top layer & again soak it. Lightly spread the mousse on top & sides of the cake.
- Refrigerate the cake until mousse sets (about 1 hr). I refrigerated for 24 hrs prior to cutting covered in a cake dome as I wanted the flavors to really set in. Serve chilled.
Notes
- You can make a full recipe cake and then slice it into three layers or alternatively, you can bake 3 layers in separate pans by placing them in a big oven together.
- You can whip the ganache before spreading it as filling.
- The consistency of ganache for topping and filling is different. For filling, you need a thick consistency (which you get by leaving the ganache at room temperature for a few hours) and for pouring as a topping, you need the ganache to be pouring consistency. You can re-heat/ warm up the ganache to adjust the consistency.
- You can also prepare the mousse 1-2 days ahead of time
-
How to Make the Best Mousse Cake
Making a mousse cake may sound complicated, but trust me, it’s easier than it seems if you keep a few key tips in mind:
- Perfecting the Mousse Texture: The texture of your mousse is crucial. The key to getting that light, airy mousse is whipping the cream (or egg whites) to soft peaks before folding them into the melted chocolate. Be gentle — the goal is to keep as much air in the mousse as possible to maintain that lightness.
- Don’t Rush the Layers: To prevent the mousse from collapsing, give each layer some time to set in the fridge before adding the next one. It might take a little patience, but the results will be so worth it.
- Avoid Common Mistakes: One mistake I see a lot is using chocolate that’s still too warm when folding it into the whipped cream. Allow the chocolate to cool slightly before mixing it in. This step is essential for a smooth, glossy mousse.