 Print Recipe
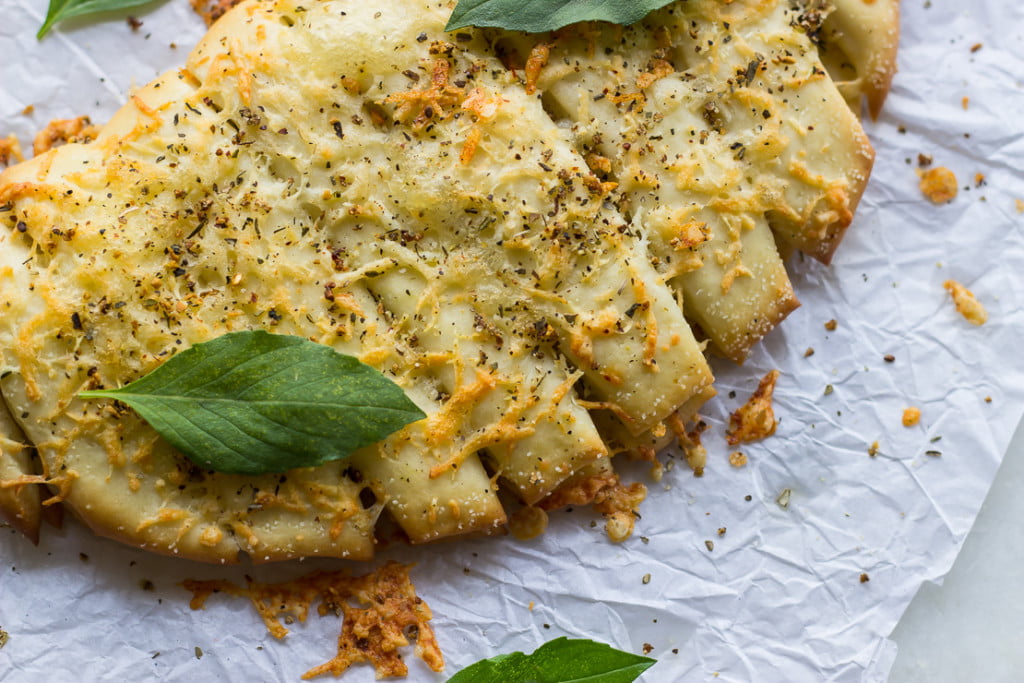
These cheesy garlic sticks are better than Domino’s. A perfect side dish for the pizza or just for the love of garlic. Fresh and homemade. These sticks are simple to make with instant yeast and all-purpose flour. You can make ahead the dough and refrigerate or freeze it. Make the sticks when you are ready in under 60 minutes from removing from the refrigerator to baking.
Choose another bread to bake from here like Domino’s copycat no-garlic sticks, pull-apart rolls, or pull-apart bread.

I am not a garlic eater, and maybe will never turn into one but yes after moving to Pune, I have started accepting it in the food served outside ie at a restaurant or a friend’s place as it is a norm to cook with garlic in this part of the country. And of course, Italian food is never complete without a healthy dose of garlic.

No pizza order is considered complete without a side of garlic sticks and even I am guilty of enjoying the sticks. Hang me. ;) I have even made Domino’s-style garlic sticks sans garlic earlier here.
But this time round I have used fresh crushed garlic to lend the original taste and flavor. How this change came about? Well, it came about when a few ladies from my society were sitting together for a potluck and we discussed the idea of starting a cooking club, where we meet once a month at one member’s house and the host will teach us any dish which she knows well and would love to share her experience and recipe with us.

Initially, there were 6 of us but as word got around in 2 days, 4 more members were added and then we had to decide to cap the limit of members up to 10 as it is difficult to teach more members in our tiny kitchens. We drew chits and well, first in the sequence was me.

Expectedly everyone wanted to learn baking, and then zeroed in on garlic bread as it is universal love. It was a pleasure to see ladies go home and try the recipe and have superb success. I could never have been happier.

I turned to my first yeast success recipe of pull-apart rolls to initiate them into yeast, if it worked for me, I was sure it would work for them. And I was right.
Here we go –
How to make Cheesy Garlic Sticks at Home?
Cheesy Garlic Sticks
Ingredients
for the dough
- 3 cup all purpose flour
- 1 cup + 2 tbsp warm water
- 1 tbsp instant yeast
- 1½ tsp salt
- 2 tbsp sugar
- 2½ tbsp olive oil
for the garlic filling
- 100 gram butter
- ½ cup fresh cilantro fresh coriander, chopped
- 2 pods garlic crushed
- ½ cup parmesan cheese grated
- to taste italian seasoning
Instructions
- Start by bringing all the ingredients to room temperature if they were refrigerated. It's best to keep the refrigerated ingredients on the counter 30 minutes prior to baking.
for the dough
- In a medium bowl, add sugar and warm water. Sprinkle instant yeast on top. Do not disturb and allow to proof for 5-8 minutes.
- In the meanwhile, mix flour and salt together in a large bowl. Add 1½ tbsp oil to the mixture.
- Pour in proofed yeast and mix in using a spatula. Coat your fingers with remaining oil and mix in the flour again using your finger tips. Knead well till the dough starts springing back upon pressing, about 5-6 minutes.
- Place the dough in a large oiled bowl and turn it over so that it is coated evenly with oil. Cover the bowl with cling film or wet towel. Allow it to rise in a warm place for about 45 minutes.
for the garlic filling
- Mix all the filling ingredients except cheese in a bowl and set aside.
assembly
- Remove the dough from the bowl and punch it down. This is the fun part! Divide the dough into 4 equal portions.
- Transfer one portion of the dough onto a floured surface and roll it gently into a disk about ½ inch thick. Apply more flour but sparingly if the dough is sticky.
- Spread ¼th portion of the filling using the back of a spoon or a knife. Sprinkle some grated cheese on top.
- Turn over one half of the disk onto the other to form a semicircle. Transfer this to a baking tray covered with parchment paper and sprinkled with mixed herbs or oregano and some grated cheese.
- Using a dough scraper, gently cut the semi-circle into sticks. Do not separate each stick but allow them to rise for 20 minutes in a warm place as semi-circle only.
- Repeat for remaining 3 dough balls.
- Meanwhile pre-heat the oven to 180 °C
baking the sticks
- While the sticks are proofing, preheat the oven to 350 °F (180 °C).
- Bake at 350 °F (180 °C) for 15 to 18 minutes, until the bread is golden brown. Don't allow them to become over brown or they will dry up.
- Serve warm.
Notes
- Semolina makes the crust crisp.
- You can even bake on backside of a baking tray/ or a round pan for easy slipping of bread.
- The success of these sticks lies in using dough scraper and not ripping the dough for anything.
- No-garlic sticks will stay fresh for 24 hours in an airtight container at room temperature. Don’t place in the fridge.
- No-garlic sticks freezes well for up to 2 months. To thaw, leave on counter or overnight in the fridge.
- It’s ok to leave the dough for rising at room temperature, however I highly recommend letting it rise in refrigerator overnight, it becomes far easier to work with.
- I love to play with the flavor of the sticks. You can keep it simple or adapt the recipe with more filling options.
- You can make the same recipe into pull-apart rolls or replace the filling with your choice of ingredients like pista, raisins, cinnamon, powdered sugar, etc
- Measure the ingredients correctly. Use standard cups and spoon measures to measure them.
- All the ingredients must be at room temperature.
- Use best quality ingredients to make this cake.
- After adding the flour, do not overmix the batter.
- This recipe can be halved, doubled, or tripled. Make sure to use the baking pan accordingly. The baking time will also differ.


I am bad at baking. Never got the hang of the basic principles :).
But I’m gonna try this one tomorrow as garlic bread is my favorite.
Way to go Subhanshu :)